
Summary
At some point you might see your phone give an error message saying, “URL Call Disabled.” This message means that there was some interference keeping your phone from registering with Verve’s hosted VoIP servers. This guide will help you resolve those tricky situations when your Polycom VoIP phone shows a “URL Call Disabled” message on the screen. In order to work properly, you need to get your phone to sync with Verve’s hosted voice system.
This error message can be caused by a number of issues including loss of connectivity from phone to local default gateway, missing parameters in the configuration of the phone, failed or incorrect DNS look ups, or incorrect LAN address to name a few. This quick reference will help uncover what issues are impeding your phone’s registration.
Some things to check on
1. Check that the phone is registered
It is important to figure out when the phone was registered with our hosted services, and when it checked in with our provisioning server. Every time a phone boots up or restarts, it must talk with the provisioning server. We need to see if we can get it to check with the provisioning server before anything else.
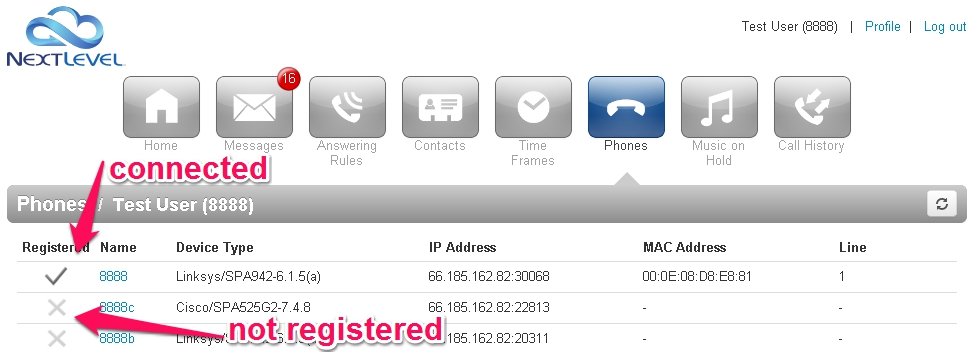
From the Verve Voice Portal, Click on the ‘Phones’ icon to view this detail. The check mark lets you know that your phone has synced with the Verve Voice system. The “X” means that your phone has not registered.
- If you see a check mark – Confirm you have dial tone and the phone should be usable. This check means our hosted server see something with your extension checking in ready for phone calls.
- If you see an “X” – This means that the NLI server current is not receiving messages from your extension. Double check the extension number and the MAC ID of the phone (see #2) and then proceed with the troubleshooting.
2. Confirm that the MAC address and IP address are correct
It will help to verify that the phone model, MAC address and your internet’s IP address match up with the phone you are trying to sync up. Double check that the phone model, MAC address and IP address (as shown in the screen above) are the same as the phone you are trying to sync. There will be a sticker on the back of your phone with the MAC address. To find your IP address use the following steps:
- Press the button on your phone marked “Menu”
- Select “Status”
- Select “Network”
- Select “TCP/IP Parameters”
- Scroll up and down to view the IP Address
In the case of a new phone or a phone replacement, you may need to let support know what your MAC and phone model are so that we can properly configure your settings on the server side. If these have been confirmed then proceed with the troubleshooting.
If the IP address is not a valid IP address for your local network then you will need to get this corrected.
If the MAC address or IP address is correct, check the physical networking. Proceed to Check the phone settings below.
Check the physical networking
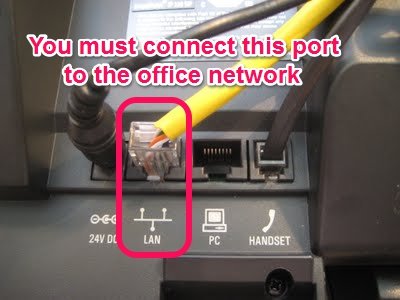
“Check the physical networking” means to check that everything is plugged in properly to a working internet connection. Double check the ports on the bottom of the phone, making sure the Ethernet cable is plugged into the LAN port and not the PC port (see picture). If everything is plugged in securely, try plugging in the phone at another known working wall Ethernet drop. When in doubt try plugging the phone directly into the switch in the server closet if you have access.
Check the phone settings
Next check on IP addressing and DNS look up. The “URL Call Disabled” message sometimes means the cable that the phone is plugged into no longer has an internet connection, or that networking has stopped working on that line, or that DNS look-ups fail from there.
Look up the phone’s address settings using the following steps:
- Press the button on your phone marked “Menu”
- Select “Status”
- Select “Network”
- Select “TCP/IP Parameters”
- Scroll up and down to view the following:
- IP Address
- DHCP Enabled/ Disabled
- IP Gateway
- DNS Server
- DNS Alt Server
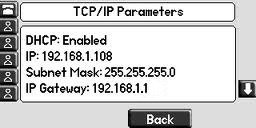
Use this information to verify the LAN Addressing is correct. Here are some helpful troubleshooting questions to consider when checking the networking:
- Does it look like there are valid numbers in these parameters? – A typical phone IP address will look something like 192.168.0.39, or perhaps 10.0.0.187. Does the IP address display all zeros (0.0.0.0) or is it missing information? If so, then skip down to Manually (or statically) assign the address of the phone.
- Does the router/gateway see the IP address of the phone? – Many gateways have a management user interface which contains a list of the connected devices. Is the address of the phone found in this list? Does the router consider the phone active.
- Can you ping the address of the phone? – This may not always help you because in many networks the computer (data) traffic is kept separate from the phone (voice) traffic, but it is still worth checking. Open up a command prompt and see if you get a reply. To perform a ping test, follow these steps:
- On Windows: Click the Windows Start button -> Type “cmd” in the search bar -> press enter to open the CMD window
- On Mac: Type “terminal” in the Spotlight Search -> press enter to open the terminal window (press ‘Control+C’ to stop running commands if needed)
- Type in “ping 192.168.1.103” without quotes, substituting your phone’s address that you found in the step above.
- If you see “Reply from 192.168.1.103: bytes=32 time=3ms TTL=255” = you phone is networked
- If you see “Request Timed Out” or “Destination Host unreachable” = pings can’t reach phone
- Also see if you can ping a Verve host from within your network:
- In the command window Type in “ping rec1.nextlevelinternet.com” without quotes
- Does this command give you a “Reply from” or “Request Timed Out”?
- Make note of these results as it may help in troubleshooting and continue with addressing your phone next.
Assign a static IP address to your phone
If you cannot reach your phone through a ping test, try to statically assign an IP address using this tutorial:
Statically assign an IP address
Factory Reset Procedure:
If none of the above steps have worked, you can try performing a factory reset, which will restore your phone to the default “from the factory” settings.
Contact Verve Support
If all else fails, contact the Verve support team at 858-836-0700 option 1 or support@nextlevelinternet.com for help. Troubleshooting “URL call disabled” can be challenging, but with some cooperation and testing we can help you get your phone working again.
Post your comment on this topic.