
Time: Usually 5 to 15 minutes, but sometimes 24 hours depending on Microsoft
Who: Microsoft Global Admin
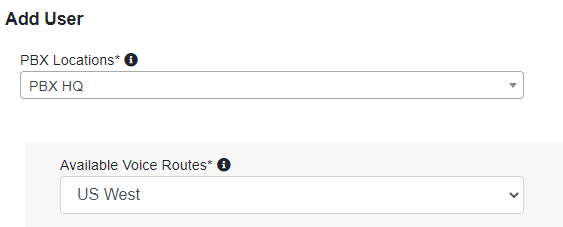
- Once logged into the Provisioning Portal navigate to the Enterprise you wish to add a user to and then navigate to User Management > Add User

- From the dropdowns, select the relevant PBX Location and Available Voice Route (typically only one option will available for each of these settings)
- Fill out the following information within the Add User section
- Teams User – Enter the persons email address
- If their email address does not appear, assign the correct Microsoft licenses to them
- SIP User – Select the Verve User (or Extension) of that person from the dropdown menu
- Phone Number – Type in the User’s Extension Number here (this is preferable over phone number)
- Disable Voicemail in Teams if you plan to use voicemail within Verve.
- It is recommended that this is disabled unless the user will be primarily working within the Teams environment, otherwise ALL voicemails for that user will be answered and recorded in Teams.
- Teams User – Enter the persons email address

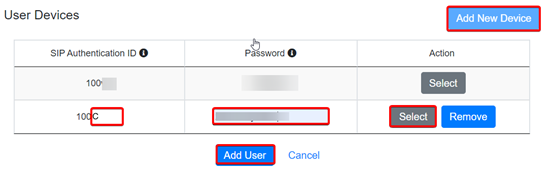
- In the User Devices section fill out the following information
- Enter c for the Suffix (if the “c” user already exists, simply click select)
- Enter a Randomly Generated Password for Password recommended 8 digits letters and numbers, no special characters
- Click Select and then click Add User
- Once the user is successfully added the Microsoft Global Administrator will receive an email confirmation telling them that the user has been provisioned successfully.
- If user is added by Verve, Client’s Global Administrator will need to log in and click ‘Sync users’ on the dashboard page to complete the process.
- The provisioning of a new user usually takes just a few minutes but can sometimes take longer to propagate in Microsoft servers. Once successfully registered, the User will appear with green icons indicating they are registered on the Enterprise Portal Dashboard.

Bulk Import
If adding users is done by Verve, the Client’s Global Administrator will need to log in and click ‘Sync users’ on the dashboard page to complete the process.
It is recommended to ask Verve for support to do a bulk upload – simply send us the list of email addresses you would like added, along with the user’s name and extension number if available.
You can right-click and “Save link as” here to download a CSV file Teams Users bulk import template (change the file typ to .csv)
| TeamsUserID | jsmith@acme.com | The client’s microsoft teams login |
|---|---|---|
| SIPUserID | 1001@acme.mynlv.com | Full Verve PBX SIP username |
| PhoneNumber | 1001 | User / ext number |
| DisableVoiceMail | TRUE | True = Verve voicemail, FALSE = teams voicemail |
| SIPAuthenticationId | 1001c | Clone device to be registered, usually c |
| Password | abcd1234 | Auth key/device password |
Note: the CSV includes another 6 unused column, they MUST BE INCLUDED but should remain blank
- Navigate to User Management > Bulk Upload Users
- Select the proper Location and Route then upload your file
Post your comment on this topic.